This article presents methods to check a compromised asset using THOR. We recommend live forensic scans. If unavailable, scan with a live operating system or create a forensic image.
Scanning the asset in normal operation mode
If an asset shows signs of compromise, scan it with THOR in normal operation mode without network access. This will also check the services and memory and better isolate the source of the threat.
Please proceed with the following steps:
-
Issue a license in our Customer Portal, if no license file exists for the compromised asset. Otherwise, download the existing license and the current THOR package.
-
Unzip THOR onto a USB stick.
-
Boot the compromised machine without network connection in normal mode (disable WLAN and disconnect network cable).
-
Plug in the stick and scan the asset with THOR. For a potentially compromised asset, we recommend using the
--intense --norescontrolflags.thor64.exe -p c: --intense --norescontrol
Scanning the asset via Debian Live Linux
If you cannot ensure your asset is not connecting to the network via the compromised operating system or you cannot boot from the operating system, the safest way to check with THOR is to use a live operating system on a USB device.
There is a wide range of live operating systems. This example uses Live Debian in console mode with a persistence store to scan a Windows system.
If the asset system drive uses Bitlocker encryption, follow the additional steps below. Ensure the Bitlocker key or password is available, and the USB drive and persistent partition have enough space for the decrypted data.
To retrieve THOR and the license, the Customer Portal API Key is mandatory.
Please proceed the following steps:
-
Download Debian Live Linux Standard ISO.
-
Download Rufus Portable (Windows only).
-
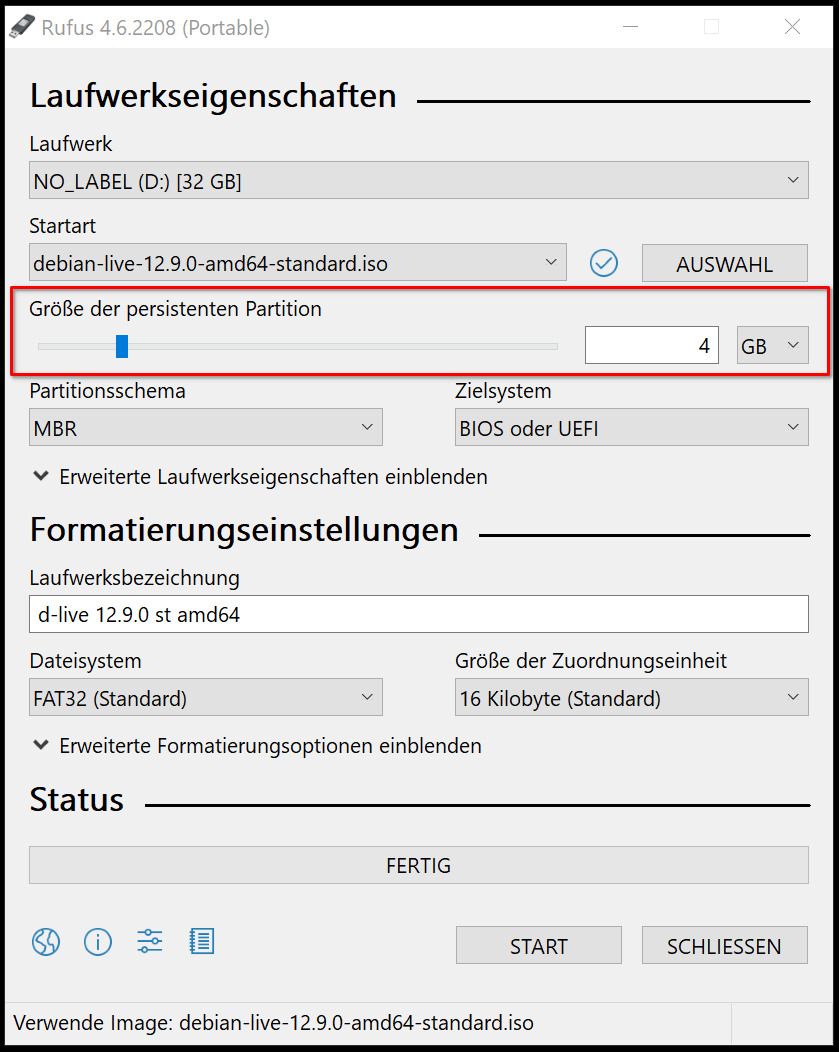
Create a USB boot device including a persistent partition.
-
Boot the asset from your USB device.
-
If required, change the keyboard layout:
sudo -s dpkg-reconfigure keyboard-configuration setupcon -
Install required tools (including
dislockerfor Bitlocker decryption if required). A network connection is mandatory for this.apt install dislocker ntfs-3g -y -
List the partitions, to identify the NTFS partition
fdisk -l -
Create a mount folder for the NTFS partition:
mkdir -p /mnt/ntfs
If Bitlocker is not in use:
Mount the NTFS partition as read only.
mount -o ro -t ntfs /dev/sdaX /mnt/ntfs
If Bitlocker is in use:
Create a decryption folder and decrypt the partition as read only. Please be aware, that there is no space between -p and the Bitlocker key. If you have used a user password instead of a recovery password to encrypt your NTFS, you have to use the flag u instead of p.
disklocker -v -V /dev/sdaX -pBITLOCKER-KEY -r -- /media/bitlocker
mount -o ro,loop -t ntfs /media/bitlocker/dislocker-file /mnt/ntfs
Scan the partition
-
Download THOR from our Customer Portal with the command below. Make sure to insert your own API Key.
cd /tmp
curl" -fs -XGET -o thor.zip "https://portal.nextron-systems.com/api/v1/downloads/THOR10-LINUX.zip" -H "accept: application/octet-stream" -H "Authorization: YOUR-PORTAL-API" -H "Content-Type: application/x-www-form-urlencoded"
-
Unpack THOR
unzip thor.zip -d /thor -
Start scanning
./thor-linux-64 --portal-key YOUR-PORTAL-API -p /mnt/ntfs --cross-platform -a filescan --intense --norescontrol